Table of Contents
Toggle“A Night to Remember” stands as one of Skyrim‘s most bizarre and hilarious quests, taking players on a drunken adventure they won’t soon forget. Whether you’re tackling it for the first time or revisiting it after years away, this quest delivers unpredictable chaos and a story that perfectly captures the game’s irreverent humor. The quest begins innocently enough, just a casual drinking contest at a tavern, but quickly spirals into a series of increasingly absurd tasks across Skyrim’s frozen landscape. By the end, you’ll have stolen goats, broken artifacts, and made enemies out of giant shamans, all because of a night of heavy drinking. Understanding the quest’s structure, objectives, and potential pitfalls will help you navigate this comedic nightmare with confidence and emerge victorious with your rewards intact.
Key Takeaways
- A Night to Remember is a radiant Daedric quest that starts with a drinking contest against Sam Guevenne and spirals into retrieving four stolen items across Skyrim’s frozen landscape.
- The quest features randomized item locations and enemy encounters across different playthroughs, ensuring fresh experiences and high replayability for multiple runs.
- Success requires preparation with healing potions, appropriate gear, and high-level armor; underestimating enemy difficulty at the Daedric Artifact location is a common mistake that catches unprepared players.
- The quest rewards players with Sanguine’s Rose, a powerful unlimited-charge Daedric artifact staff that summons a Dremora Lord for combat assistance.
- Melee warriors and magic-heavy builds (especially conjurers) excel at this quest, while archers are best suited for stealth-focused item retrieval without direct combat.
- The entire adventure from drinking contest to artifact recovery typically takes 30 minutes to several hours and delivers comedic storytelling that captures Skyrim’s irreverent humor and memorable moments.
What Is A Night To Remember?
Quest Overview and Objectives
“A Night to Remember” is a radiant Daedric quest that involves the Daedric Prince Sanguine, the deity of excess and debauchery. The quest starts when a mysterious bard named Sam Guevenne approaches players in a tavern and challenges them to a drinking contest. What begins as a simple competition transforms into something far more complex, the player wakes up without memory, scattered across Skyrim, with various items and obligations tied to people the character apparently wronged during their blackout.
The core objectives involve locating four specific stolen items and returning them to their rightful owners. Players must track down a Keg of Mead, a Caliph’s Couture, a Statue of Dibella, and a Daedric Artifact, each hidden in different locations and guarded by various enemies. The quest isn’t linear: objectives appear as the player progresses, and some items require combat encounters to retrieve. Once all four items are gathered and returned, the player must confront Ysolda in Whiterun, leading to the quest’s climactic and darkly humorous conclusion. The entire experience tests player navigation skills, combat ability, and patience with Skyrim’s occasional glitches and unexpected enemy spawns.
How to Start the Quest
Finding the Drunken Huntsman Tavern
The quest’s entry point is the Drunken Huntsman, a small tavern located in Whiterun’s residential district. To find it, head to Whiterun’s Drunken Huntsman tavern building, it’s marked on the map and relatively close to the marketplace. The tavern interior is unremarkable: wooden furnishings, a bar counter, and the usual Skyrim ambiance. Players should note that unlike major inns such as the Bannered Mare, the Drunken Huntsman is less crowded, making the quest’s initial encounter more intimate and atmospheric.
The tavern is available to visit during any time of day, though the quest typically triggers when Sam Guevenne is present. If the tavern feels empty, try waiting or fast-traveling to a different location before returning. Some players report that visiting during evening hours increases the chances of finding Sam, though this may be coincidental due to NPC scheduling.
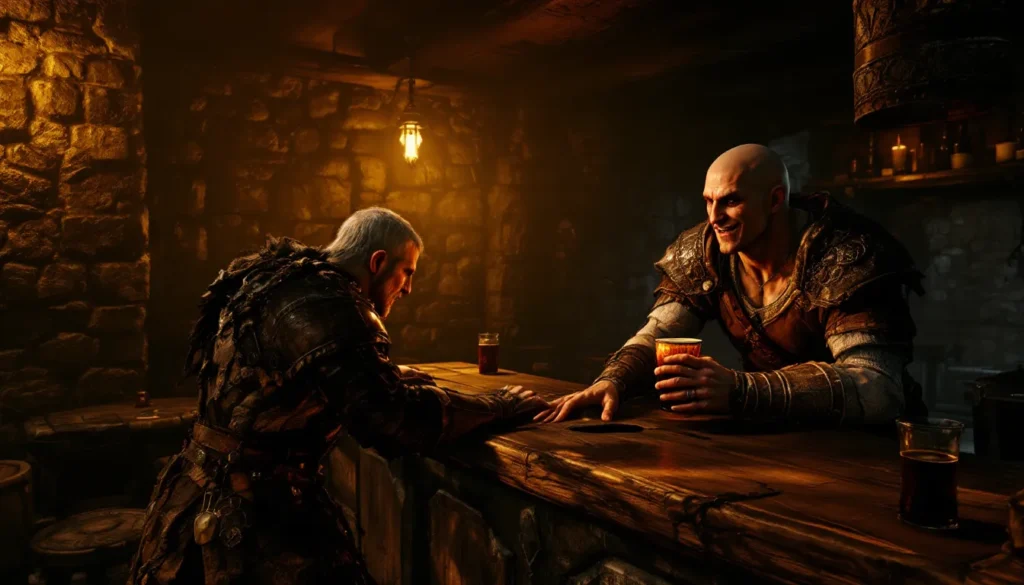
Meeting Sam Guevenne
Once inside the Drunken Huntsman, locate Sam Guevenne, an Altmer bard with a mischievous demeanor and the telltale appearance of someone who spends far too much time drinking. Sam will approach the player and strike up a conversation about drinking contests. He’ll challenge the player to a drinking contest, wagering gold and bragging rights. Accept the challenge, and the actual drinking mini-game begins.
Sam is friendly but has a sinister undertone, he’s actually a Daedric servant of Sanguine in disguise, though players won’t realize this until later. During the conversation, he’ll claim to be a bard looking for excitement and mentions hearing stories about the player’s exploits. The dialogue is written with natural tavern-speak, complete with drunken slurring that becomes more pronounced as the contest progresses. Accepting Sam’s challenge is the only way to trigger the full quest sequence.
The Drinking Challenge Explained
Winning Against Sam in the Bar Contest
The drinking contest itself is a simple but engaging mini-game. Players and Sam take turns drinking from Sanguine’s Rose Mead, each round increasing both characters’ intoxication levels. Visually, the screen becomes increasingly blurry and distorted, and the camera sways more dramatically with each drink. The contest continues until one participant blacks out entirely.
To win, players must match Sam’s drinks without backing down. The game provides button prompts or key presses (depending on platform) to accept each round. There’s no mechanical way to fail the contest, players simply keep accepting drinks until they lose consciousness. The outcome doesn’t matter for quest progression: whether the player wins or loses, they’ll black out and wake up with memory gaps and scattered objectives. But, winning the contest provides a minor sense of accomplishment and fits the narrative better. Some players note that the contest’s visuals are humorous enough to warrant experiencing it fully rather than spamming through dialogue.
What Happens After You Drink
Once both characters are thoroughly intoxicated, the screen fades to black. The player wakes up somewhere unexpected, typically in a field, building, or location far from the tavern. The exact location varies, but common wake-up spots include areas near Markarth, Morthal’s Longhouse, or other notable locations. The player has no memory of events after the drinking contest and must piece together what happened based on clues and NPCs they encounter.
At this point, the quest marker updates with the primary objective: retrieve four stolen items and return them to their original owners. The player receives minimal guidance: instead, they must explore and discover that townspeople have complaints about items that were supposedly taken or broken during the previous night’s drunken shenanigans. This lack of direction is intentional, it forces players to explore and investigate, adding to the quest’s chaotic, unpredictable nature. The amnesia mechanic is central to the quest’s humor: players experience the same confusion and disorientation as their character.
Gathering the Missing Pieces
Finding the Stolen Items Across Skyrim
The four items that need to be recovered are scattered across different locations, each requiring specific actions to obtain. The Keg of Mead is typically located in a cave or bandit camp: retrieving it often requires defeating enemies guarding the area. The Caliph’s Couture (a fine robe) might be hidden in a building or on an NPC that must be pickpocketed or looted. The Statue of Dibella, a valuable religious artifact, is usually placed in a shrine or temple. Finally, the Daedric Artifact (the quest’s final and most challenging item) is often guarded by powerful enemies or placed in a dangerous dungeon.
The exact locations and guardians are randomized within certain parameters: the quest is flagged as “radiant,” meaning the locations change on different playthroughs. This design keeps the quest fresh but also means no single guide covers all possibilities. But, the game provides journal entries and NPC dialogue hinting at where items might be. Paying attention to what townspeople say during conversations provides valuable clues about item locations.
Players should prepare for combat before seeking these items. Bring healing potions, restoration spells, or leveled followers to assist in battles. Some locations house high-level enemies, making preparation essential for lower-level characters. The quest scales to player level to some degree, but underestimating enemy difficulty can lead to quick deaths and frustrating reloads.
Locations and Combat Encounters
Each item location introduces unique challenges. Bandit camps guarding the mead require straightforward combat against multiple enemies, bring area-of-effect damage or crowd control abilities to manage groups efficiently. If attempting to pickpocket the Caliph’s Couture from an NPC, ensure stealth is available or that the NPC is in a private location where combat won’t trigger nearby guards.
Temple locations housing the Statue of Dibella often include priest NPCs or religious enemies: some temples feature magical traps requiring perception and careful movement to bypass. The Daedric Artifact location is typically the most hazardous, potentially involving Daedra summoners, powerful mages, or hostile warrior encounters. The game often places this item in dungeons already known to be dangerous, adding environmental hazards on top of enemy threats.
Fast-travel becomes crucial during this phase. Once the item locations are known, players can fast-travel between them, collect what’s needed, and move to the next location without prolonged trekking. But, fast-travel breaks immersion for some players who prefer the journey aspect. Either approach is valid: the quest doesn’t enforce movement methods. Using local NPCs’ dialogue as waypoints (they mention the rough direction or nature of an item’s location) helps uncover item locations without heavy trial-and-error. Consulting Nexus Mods for quest mods that clarify objectives can be helpful if players become stuck or frustrated with the radiant design’s ambiguity.
The Final Step: Returning to Ysolda
Completing the Quest and Rewards
Once all four items are collected, the quest directs the player to speak with Ysolda, a Redguard merchant typically found in Whiterun’s marketplace. But, there’s a twist: Ysolda has no idea what the player is talking about when items are presented to her. Instead, Sanguine himself appears, revealing that the entire chaos was orchestrated as a test or experiment by the Daedric Prince. Sanguine is impressed by the player’s determination and willingness to clean up the mess caused by a night of drunken excess.
As a reward, Sanguine grants the player a unique artifact: Sanguine’s Rose, a Daedric artifact staff that summons a Dremora Lord to aid the player in combat. Sanguine’s Rose is a potent weapon, particularly valuable for magic-focused builds or characters lacking summon abilities. The staff has unlimited charges (unlike most enchanted weapons) and the summoned Dremora Lord is a formidable combatant. Also, the player receives gold from Sanguine as compensation for their efforts, though the exact amount varies.
The quest officially concludes with this encounter. The player’s journal updates to reflect the quest’s completion, and Sanguine vanishes, returning to his Daedric realm. The entire experience, from drinking contest to artifact recovery, takes anywhere from thirty minutes to several hours depending on player experience level and build effectiveness. The quest’s non-linear nature and radiant design mean replay value is high: subsequent playthroughs will feature different item locations and challenges, keeping the experience fresh.
Tips for Successfully Completing A Night To Remember
Best Character Builds and Preparation
The quest’s difficulty scales with player level, but certain builds naturally excel at navigating its challenges. Melee-focused warriors should stock up on stamina restoration potions and equip heavy armor with high physical resistance. Two-handed weapons like great swords or warhammers provide decent crowd control through power attacks, making fights against multiple enemies more manageable.
Magic-heavy builds (destruction mages, conjurers) have advantages in range and crowd control. Frost spells slow enemies, fire spells deal burst damage, and summons (daedra, atronachs) tank damage while the player casts from safety. Conjurers particularly shine since they can summon allies to handle enemy threats while they manage resources.
Archer builds excel in stealth-focused scenarios, especially when retrieving items that don’t require direct combat. Pickpocketing or silent takedowns minimize detection risks. But, archers struggle against heavily armored foes at close range, so maintaining distance is essential.
Stamina-based, unarmed builds (rare but viable) aren’t ideal for this quest: hand-to-hand combat against enemies wearing heavy armor is inefficient. Hybrid builds combining melee and magic offer flexibility and are arguably the safest approach for newer players.
Regardless of build, prepare before starting the quest:
- Stock healing potions (at least 10-15 depending on difficulty setting)
- Carry stamina and magicka restoration potions matching your primary resource
- Equip high-level armor or protective spells appropriate to your build
- If using ranged weapons, ensure adequate ammunition or magicka reserves
- Consider recruiting a strong follower to assist in combat encounters
- Quicksave frequently, especially before entering unknown locations
Common Mistakes to Avoid
The most frequent mistake is underestimating enemy difficulty. Players often assume the quest is comedic enough to be mechanically easy, then encounter high-level enemies unprepared. The quest doesn’t explicitly warn about enemy scaling, but the Daedric Artifact location in particular can house encounters beyond casual player expectations. Always scout locations cautiously: if enemies seem overwhelming, retreat, level up, and return with better gear or followers.
Another common error is misunderstanding the quest’s radiant nature. Players expecting specific item locations from guides become frustrated when items appear elsewhere. Solution: trust NPC dialogue clues and explore systematically rather than chasing outdated walkthrough information. If stuck, check in-game journal updates for the most current objective markers.
Inventory management becomes problematic when juggling four items plus personal equipment. Ensure backpack space by selling or storing unneeded items before beginning the recovery phase. Overweight characters move slowly, making escape from difficult encounters harder.
Some players attempt to complete the quest at low levels (below 5-10) without realizing enemy scaling will make encounters frustratingly difficult. While the quest doesn’t explicitly recommend a minimum level, attempting it around level 15+ provides a more enjoyable experience for most players.
Final mistake: forgetting the quest is Daedric in nature. Talking to NPCs during or after the quest may trigger dialogue about Daedric association or summons. This is intentional, not a bug. Some role-players avoid this quest due to its Daedric alignment: simply be aware of this choice before committing.
Referencing Shacknews and other gaming news sites provides updated information if patches or DLC have altered the quest’s mechanics since release. Player communities on forums also share specific location discoveries and strategies that can ease frustration. Also, exploring Skyrim Dungeons: Uncover Secrets, Solve Puzzles, and Conquer Epic Challenges on this site offers deeper dungeon-crawling strategies that apply to several of this quest’s item-gathering locations.
Conclusion
“A Night to Remember” ranks among Skyrim’s most memorable quests, blending humor, mystery, and action into a cohesive adventure that rewards exploration and perseverance. The quest’s radiant design ensures that no two playthroughs are identical, providing replayability that few Skyrim quests match. Success requires preparation, patience with ambiguous objectives, and willingness to engage with the quest’s chaotic nature rather than resist it.
The Sanguine’s Rose artifact reward justifies the effort, offering a powerful tool for summoning-focused builds or characters seeking a unique legendary weapon. Beyond mechanical rewards, the quest delivers comedic storytelling and memorable moments that encapsulate Skyrim’s irreverent tone, a reminder that not every adventure in the province is about saving the world from dragons.
For players tackling the quest in 2026, the mechanics remain unchanged from earlier releases: no major patches have altered objectives or item locations. Whether it’s your first playthrough or a return visit, approach “A Night to Remember” with an open mind, adequate preparation, and appreciation for the absurdity. The adventure may start with a simple drinking contest, but it transforms into one of Skyrim’s most unique quests. Embracing the chaos and completing the recovery is its own reward, offering a story worth retelling to fellow adventurers. For even more memorable Skyrim moments, exploring Skyrim Funny Mods: Transform Your Gameplay with Hilarious Adventures can enhance future playthroughs with humor that matches this quest’s comedic spirit.